Helen Wigley
Artist
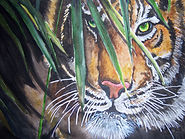
Tiger
(Advanced level, previous knowledge of watercolour techniques required)
I have developed below a simple step-by-step demonstration based on my painting shown in the watercolour section of this web page. These are free and you may print them off if you wish.
I suggest you read all the instructions before attempting the watercolour painting to familiarise yourself with each instruction, because watercolour painting is all about timing (If you see a clock face image; timing is essential here)
Click on the image for enlarged picture.
Where you see the clock symbol, read the instructions carefully, it’s all about the time?
Good luck with your painting and I hope these inspire you ?

Suggested colours and materials
wrong set
Suggested colours, as follows:
To produce this watercolour painting I have used the following colours: - Lemon yellow, Ultramarine, Cerulean blue, Cadmium red, Burnt umber, Sap green, Burnt sienna, Yellow Ochre, Raw sienna and Lamp black.
To enable the artist to retain the white of the paper, we use the method of masking out. I used a ruling pen and masking fluid (See Image) to mask out some highlights on the glass (See image). A Brush can be used to apply the masking fluid but wash out straight away because it ruins the brush if left to dry.

Sketch the painting
Step 1
Step 1
Sketch out your tiger image onto watercolour paper. Mask out all the white areas and leave to dry.

Step 3
Step 3
Continue to do step 2 all over the tiger face, don’t try to go to dark to quick, we will build up the tones as we go along. Leave to dry

Step 5

Step 5
To produce the texture on the top of the tiger’s nose we are going to use the same brush, but this time use a dabbing motion instead of the flick you used before.

Step 7
Step 7
To paint his nose use Cadmium red, burnt sienna; by wetting the nose area first then add the cadmium red and while the paint is still damp add in the burnt sienna.(see pic)

Step 9
Step 9
Once all the paint is dry, rub off the masking fluid. You will find that the white looks too bright, so soft off the white by using a damp brush and the surrounding colour.

Step 11

Suggested brushes
wrong set
Suggested brushes:
To produce this watercolour painting I used the following watercolour brushes: Medium flat brush, large round brush, small detail brush and small round brush.

Step 2

Step 2
One the masking is fully dried; we are going to start on the tiger’s fur. With Yellow ochre, Raw sienna, Burnt sienna and also a combination of Ultramarine and Burnt umber to produce a grey.
These colours are going to be the base of the tigers face; wet the tigers face (see pic) and allow the colours to blend together to create various tones. Make sure you don’t cover any of the leaves/grasses.

Step 4

Step 4
Next we are going to look at the texture of the fur; using small flat brush which is only damp, dip onto the colours from step 1 and flick the damp brush to the direction of the tiger’s fur. (See pic)Use this technique cross the tigers face except his nose.

Step 6
Step 6
Now we can add in the darker tones using lamp black mixed with ultramarine (see pic)use this mixer for his dark fur markings and also around his eyes and nose.

Step 8
Step 8
Next are the leaves/grasses, using sap green, ultramarine and lemon yellow paint in the leaves wet on dry. Allow the colours to mix on the paper to create different tones. (See pic)

Step 10
Step 10
The last step is to look at the tigers eyes. We are going to use lemon yellow, ultramarine, cerulean blue and burnt sienna.
Wet outside of the eye with lemon yellow then towards the middle add the ultramarine and cerulean blue, leaving a small space for the burnt sienna around the black bit of the eye (see pic)
Step 11
Your paintings is now complete, stand back and see if you need to add any more details or even some Chinese white for further highlights.